Showing posts with label recipes. Show all posts

Wednesday, May 4, 2011

Recipe: Syrupy Overnight French Toast


For about six years now, I have hosted a brunch on Mother's Day.  It's simple, low-key, and no-stress, which is totally my kind of brunch.  Each of the guests brings a dish or a dessert, so thankfully I have very little to prepare on Mother's Day.

One of my favorite go-to recipes for a brunch is Syrupy Overnight French Toast. I originally saw the recipe in an issue of Good Housekeeping several years ago.  I was in a doctor's office when I spotted it, and it looked delicious (and easy!), so I stealthily ripped the page out of the magazine.  (Please tell me I'm not the only one who has ever done that.)

Anyway, this recipe never disappoints.  I love that you make it the night before, so the effort is minimal the next day.  The brown sugar caramelizes into a delicious syrup, so you don't have to add any more.  Perfection.

Overnight Syrupy French Toast


6 Tbsps. of butter
1 1/2 cups packed brown sugar
5 large ripe bananas, cut diagonally into 1/2-inch thick slices
1 (12-oz) long loaf of French or Italian bread, cut into 1-inch thick slices
6 large eggs
2 cups milk
2 tsps. vanilla extract
1 tsp. ground cinnamon
1/2 cups sliced almonds or coarsely chopped walnuts or pecans


Directions
  1. In microwave-safe small bowl, heat butter in microwave oven on High 1 minute or until melted. Stir sugar into butter until moistened. With fingertips, press sugar mixture onto bottom of 13-inch by 9-inch glass baking dish. (It's okay if mixture does not cover bottom.) Spread fresh or dried fruit over sugar mixture; top with bread slices, cut sides down.
  2. In medium bowl, with whisk, beat eggs; whisk in milk, vanilla, and cinnamon. Slowly pour milk mixture over bread; press bread down to absorb egg mixture. Sprinkle with nuts. Cover with plastic wrap and refrigerate at least 2 hours or overnight.
  3. Preheat oven to 350 degrees F. Remove plastic wrap from baking dish.  Bake, uncovered, 45 to 50 minutes or until bread is golden brown and knife inserted in center comes out clean. Let stand 10 minutes before serving.


    Enjoy!

Friday, February 18, 2011

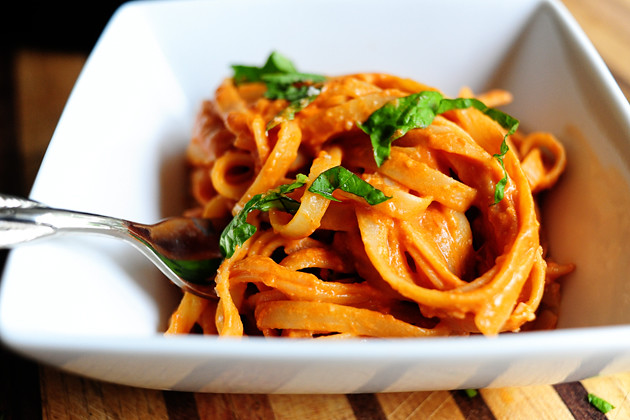
Pasta with Tomato Cream Sauce

I'm going to be honest here.  I do not love to cook.  I used to despise it.  Then I disliked it.  Then I tolerated it.  And now, only very recently, I kind of started to like it.  I cook for my family almost every night, and I think I'm pretty good at it, but I'm only now starting to find my groove, discover recipes that are keepers, and even experiment a little bit with my own recipes.

In order for a recipe to be a keeper, it needs to taste good (duh!), be relatively kid-friendly, be quick, and be easy.  A nutritious, balanced recipe is a bonus, but not necessary every night....sometimes I need comfort food!

I'm going to share a recipe with you today that isn't mine, but it meets all of my prerequisites, and I find myself craving it all the time.  I've been making it once a week!  It is NOT fat-free, but it is soooooo worth it!

source
Pasta with Tomato Cream Sauce
by the Pioneer Woman
Check out her site for great recipes, photos, and step by step instructions!


  |    |    |  
  • 2 Tablespoons Olive Oil
  • 2 Tablespoons Butter
  • 1 whole Medium Onion, Finely Diced
  • 4 cloves Garlic, Minced
  • 2 cans (15 Ounce Each) Tomato Sauce Or Marinara Sauce
  • Salt And Pepper, to taste
  • Dash Of Sugar (more To Taste)
  • 1 cup Heavy Cream
  • Grated Parmesan Or Romano Cheese, To Taste
  • Fresh Basil, Chopped
  • 1-½ pound Fettuccine

Preparation Instructions

Cook pasta according to package directions. Drain, reserving 1 cup of pasta water.
Heat butter and oil over medium heat. Add onions and garlic and saute for a minute or so. Pour in tomato sauce and add salt, pepper, and sugar to taste. Stir and cook over low heat for 25 to 30 minutes, stirring occasionally.
Remove from heat and stir in cream. Add cheese to taste, then check seasonings. Stir in pasta and chopped basil and serve immediately. (Thin with pasta water before adding basil if needed.

Delicious!  Enjoy!

Monday, February 14, 2011

Valentine's Day Love

Happy Valentine's Day, Everyone!

Here's a quick and easy way to love up your kids on special mornings.  Heart pancakes!


When you make the pancake batter, reserve about 1/2 cup in another bowl.  Add a few drops of red food coloring to the reserved batter.  Then put the red batter in a plastic Ziploc baggie and snip off a tiny corner so you can squeeze a small amount of the batter out.  (Or, if you're fancy and have one of those tools for cake decorating, use that.  I don't even know what those things are called!)

Pour the regular batter onto the griddle.  Immediately after the batter is poured, use the red batter in the Ziploc to draw a heart on the pancake.  Then cook as usual.


Watch as your children squeal with delight when they see their heart pancakes!  :)


Hope everyone has a wonderful day!

Thursday, October 21, 2010

The Lord's Pumpkin Roll Recipe

You know what October means in our house?  Besides children screaming hysterically on hayrides (Nathan), children drinking my pumpkin spice coffee when I'm not looking (Charlotte), and children insisting they want to be princesses for Halloween (Gavin)? It means pumpkin roll, people!

In our house, we call this recipe The Lord's Pumpkin Roll.  In order to understand why we call it by this name, you need to hear a little story.  A few autumns ago, we were at a friend's house for a potluck dinner.  I made the pumpkin roll for dessert.  Our friend Ray snuck off to the kitchen after dinner to help himself to a slice of the pumpkin roll.  After the first bite, he began singing a song to the pumpkin roll.  A song about how delicious the pumpkin roll was, and how much he loved it, and how it "came from the Lord."  All of this was sung in a hilarious falsetto.  Sacrilegious?  Perhaps.  Delicious?  Absolutely!

Edited to add:  This recipe was originally shared with me several years ago by a fabulous woman named Mollie. It was love at first bite, and I haven't stopped making it since!  :)

Here's the recipe:

The Lord's Pumpkin Roll

Ingredients:
3 eggs
2/3 cup pumpkin puree
1 cup sugar
1 tsp. baking soda
1/2 tsp. cinnamon
3/4 cup flour


Mix the ingredients in an electric mixer.  Put parchment paper in a 9 1/2 by 13 3/4 cookie sheet.  Grease the bottom and sides of the parchment paper with shortening.  Pour the batter into the pan.


Bake at 375 for 15 minutes.  Meanwhile, lay out a dishtowel and sprinkle it with granulated sugar.  Grasping the ends of the parchment paper, remove the roll from the pan and place it unpapered side down on the dishtowel.  Peel off the parchment paper, and immediately roll the pumpkin roll in the towel (while still hot).  Let the pumpkin roll cool in the towel for 2 hours.  As it cools, it will keep the "rolled" shape.

As the roll cools, mix the cream cheese filling.

Cream Cheese Filling recipe:

2 Tbsp. soft margarine or butter, softened
1 8-oz. package cream cheese, softened
1 cup powdered sugar
3/4 tsp. vanilla

Mix ingredients in mixer until creamy and smooth.  Unroll pumpkin roll from towel.  Spread cream cheese filling over roll, and reroll.  Keep refrigerated.  Sprinkle powdered sugar on top when ready to serve.

*This recipe can be frozen.

Here's another look at the finished product:


And here's what you'll get for your efforts!

Friday, August 20, 2010

Late Summer


School/Work begins for me in a little over a week, so I'm doing my best to cram as much as I can into these final days of summer vacation.  The kids and I are playing in the park a lot, consuming way too many popsicles, and splashing in the water whenever we can.  We're even attending a Wiggles concert tomorrow (Excedrin Migraine is already in the purse), and we're taking the twins to their first Phillies game in two weeks.

Believe me, I count my blessings every day to be able to work in a profession where I have my summers free to spend with the kids.  But that doesn't make it any easier (or make me feel any less guilty) to go back to work.  Charlotte and Gavin really seem to thrive in daycare.  This year they will be in preschool, and I know they will continue to astound me with their ability to learn new things quickly and adapt to any new situation with ease.  (Case in point:  at a playground recently, I observed Gavin walk right up to another little boy and say, "Hi.  I'm Gavin Michael.  Let's play!"  And off they went.)

But again, it doesn't make me feel any less guilty.  I've been thinking a lot lately about how I will never get to see them off on their first days of school, because they are my first days of school as well.  Sure, Michael will be there.  Probably my mom will too.  But I don't think it's the same.

One of the things I do that makes me feel a little better about working is to pack a special lunch for the kids.  A lot of the other kids are get Lunchables or something of the sort, so I go out of my way to pack things in a cute container and arrange the food in a interesting way.  It sounds silly, I'm sure, but I hope that as the kids get older they realize that this is a little gesture of love that they can count on in the middle of their day.  For the past few weeks I've been experimenting with different recipes that will hold up well in their lunchboxes.  Yesterday, I tried my hand at homemade granola bars.  I needed a recipe that didn't use peanut butter since their day care is peanut-free, and this one from another lunch fit the bill.  It was DELICIOUS!  The kids gobbled up three bars each today.  


The bottom photo shows how Melissa at Another Lunch suggests wrapping the bars since they tend to crumble.  It's just a bonus that they look so cute!

Wow, this blog sounds more and more like a food blog lately, huh?  Trust me:  it's not! :)

Monday, August 9, 2010

From Garden to Table


First, let me say this:  Why on earth can't I figure out how to use Blogger?  I have a Master's Degree in Instructional Technology, for Pete's Sake.  I can't ever get things lined up right, my photos are all over the place...annoying.  Any tips?

On to the topic of this post:
I'm definitely not what you'd call "a natural" when it comes to cooking.  I'm learning; I'm actually to the point where many times I don't need to follow a recipe.  But it isn't really something I would say I enjoy.  I think I might, one day....like one day when there aren't three kids screaming at me in the kitchen.  

My mom is an excellent cook, and an excellent gardner.  She was recently away for two weeks, and I was encouraged to take whatever was ripe from her garden.  I am not exaggerating when I tell you she had hundreds of tomatoes ready for the picking in her garden.  So Charlotte, Gavin, and I picked five or six dozen and brought them home.  But there are only so many times we can eat sliced tomatoes and mozzarella for dinner.  (Full disclosure:  I could eat it every night, for every meal.  But the twins remind me that "wedon'tlikePOTATOES!!!!")

So, even though when it comes to tomato sauce I usually only open the lid on the Prego, I decided that I'd try my hand at some homemade sauce.  This is probably old hat to all of you.  I'm sure you've been making your own tomato sauce for like, years.  But this was a major step for me...so much so that I took photos!  Michael was all, "What are you DOING?  Trying out for the next Food Network Star?"  He can be such a hater.  :)

Here's what I was working with:
Some yummy Roma tomatoes, organically grown.  Apparently they make the best sauce.


The next step took the longest, but certainly wasn't difficult:  cutting out the stems and chopping the tomatoes:


Then, I added everything to the pot and let it simmer on medium.  As the tomatoes boiled down, I was left with A LOT of water.  Way more water than I thought.  I took my mom's advice and ladeled the water out as I went.


To separate the seeds and flesh from the tomato juice, I used a contraption of my mom's.  I have no clue what it's called (anybody know?), but she uses it for tomato and apple sauce.  I placed what was left of the tomatoes in the colander and moved the wooden tool around the perimeter of the colander, and voila!  Left with about 4 cups of tomato sauce!  (EDIT:  I am rereading this and laughing at my inability to use precise language about this cooking tool!  Wooden tool?  Embarrassing!)


Seriously...all those tomatoes yield only 4 cups?  How the hell many tomatoes are in a jar of Prego??


I froze some.  For dinner tonight, I sauteed an onion and garlic in about 3 Tbsp of butter.  (You could use olive oil, but I love the way butter rounds out tomato sauce!).  I added the fresh tomato puree and some salt and pepper.  I wish I would have had some fresh parsley...would have been a great addition.  I poured the whole thing over spaghetti and dinner was done.
The boys loved it:
Nathan doing what he does best...
Gavin just thinks I'm nuts, as usual.  

Bon appetit!

Related Posts Plugin for WordPress, Blogger...